Making a Series
A Developer's Life For Me © James Troi
In an upcoming competition we require our members to create a "series" of images and present them in a single image for entry. Following are some tips on how to make your "Series" entry.
Notes:
A series for our purposes is defined as:
“A photographic series is a collection of images that are themed together and shown together. Your series should be telling the same story or continuing a same theme. Minimum of three images, collated into the one image for submission.”
The instructions below are related to making your Series image for entry into a Digital/EDPI competition. For print entries higher values for Width, Height, and Pixels/Inch should be used corresponding to your printer requirements.
See the process for:
Photoshop
NOTE: We are using Adobe Photoshop release 23.4.2 when compiling these notes. The processes advised here are subject to change with subsequent versions of photoshop, some earlier versions of Photoshop may not have some features mentioned here, or may operate in a slightly different way, though we believe most versions can do these fairly simple tasks as described here.
To make your series with the “Place Embedded…” method
- Open Photoshop
- Menu: File > New…
- In the “New Document” dialogue window set the size of your image to the following:
- Width: 1920 Pixels
- Height: 1080
- Resolution: 72 Pixels/Inch
- In the menu select: File > Place Embedded…
- Navigate to where your images are and select your first image.
- Select your first image and click “Place” (or just double-click the image)
Note you can also complete steps (4-6) by simply dragging and dropping your image from your computer file system onto the newly created canvas. - Your image will appear in your main document, typically fitting itself to the height or width of your document, in a “transform” state, meaning you can resize it by dragging by the corners.
- To resize proportionately hold down the “Shift” key while dragging a corner.
- To resize proportionately and towards the centre, hold down “Shift” and “Option” (“Alt” on PC) while dragging and all corners will move into or from the centre.
- Once your first image is placed repeat steps 4–7 until all remaining images are imported.
Note for the purpose of this competition round at least 3 images are required for your final image to be considered a “Series”. - When you have all your images in, move them around and resize as required to get the look you want.
- If you want to add a border to individual layers:
- Double-click on the layer, just past the end of the layer’s name to launch the “Layer Style” options
You can also get this to appear by selecting the layer and choosing the “ƒx” button at the bottom of the layers panel. - For a border: Click on “Stroke” (the text not just the checkbox)
- Set the size of the border you want
- Set it to “Inside”
- Select the colour by clicking on the rectangle next to the word “Color”
- Click “OK”
- To copy this to your other layers hold down “Option” (Alt on PC) while dragging the “Effects” item that has appeared under your initial layer onto your other layers. This will copy the same effects to each layer as you drag and drop it onto them.
- Double-click on the layer, just past the end of the layer’s name to launch the “Layer Style” options
- When you’re done making changes to your series you’ll want to save it. To save as a JPEG for a digital competition:
- In the menu go File > Export > Export As… (Shift + Option + Command + W)
Note in some earlier versions this option is not available, you can use the File > Export > Save For Web instead. - When the “Export As” dialogue box appears you should be pretty much right to go but just to be sure check the options are the following:
- File Settings
- Format “JPG”
Quality: 6 or greater
(note in some versions of Photoshop this scale goes to 12 in which case it should be set to 10 or greater, in the “Save for web” dialogue box this is a percentage set to 80 or greater)
- Format “JPG”
Quality: 6 or greater
- Image Size
- Width: 1920
- Height: 1080
- Scale: 100%
- Resample: Bicubic Automatic
Though this won’t matter if you’re not changing your original size
- Canvas
You shouldn’t need to change)- Width: 1920
- Height: 1080
- Metadata
- Set to "None" just to be safe
Some competitions don't allow the embedding of any identifiable information so as not to influence the judges should they come to know the maker of the image.
- Set to "None" just to be safe
- Color Space
- Check “Covert to sRGB” to on
- Check “Embed Color Profile” to on
- File Settings
- Click Export
In the Save dialogue box ensure your file name conforms to competition requirements:
- Named using six (6) segments as follows:
- Grade: A or B
- Competition number three digits with leading zeros, as required, followed by an underscore: 021_
- Category followed by an underscore: Open_ or Set_
- Format followed by an underscore: Digital_ or Print_
- Image title, with words separated by underscores: eg: A_Developers_Life_For_Me
- File extension .jpg
- Resulting in: A021_Set_Digital_A_Developers_Life_For_Me.jpg
- Named using six (6) segments as follows:
- In the menu go File > Export > Export As… (Shift + Option + Command + W)
- Email your entry to the Competitions Steward: competitions@williamstowncameraclub.com.au
How to video
Adobe Lightroom Classic
I had started to write out detailed instructions, honestly though, the Photoshop method is WAY easier... but if you would like to do this in Lightroom you can check out the article from Digital Photography School which Gayle sent me: "How to make a Triptych in Lightroom".
Updated - August 3rd 2022
Never let it be said I won't admit when I am wrong... and on this, I was wrong. If you don't know how to use Photoshop very well then Adobe Lightroom Classic does a decent job at making a series; though it has its own fiddly bits to deal with.
But I put together a short live video on Facebook and so we share it here... will likely do another one to make it more clear, as I still jumped around a bit in this one, but hey, you get to see it warts and all as they say. I'm certainly no expert in the Print module of Lightroom Classic, but I show you what we learned as a group last night and hope it will help you in creating your own series.
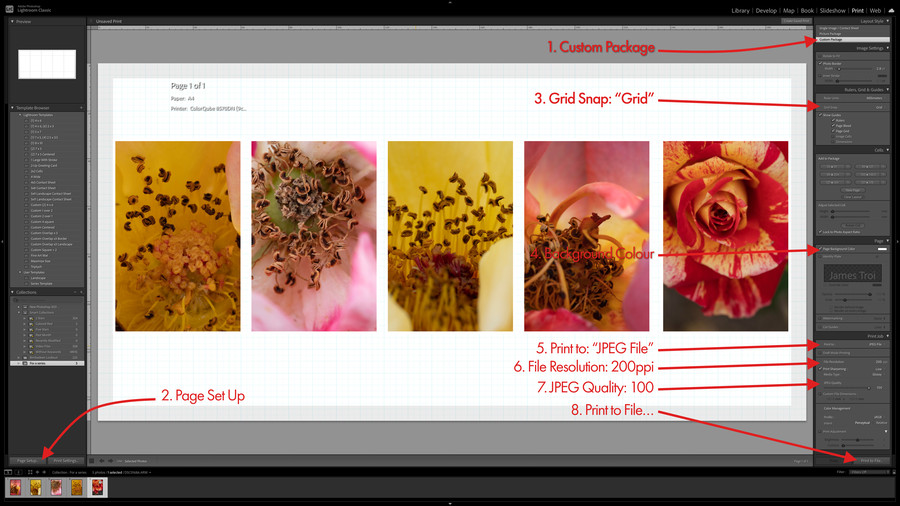
Before we get to the video, a little cheat sheet on the Print Module window and the important parts when it comes to our use of it to make a series image to output as a jpeg for competition.